Dehydrating Flowers, Fruits & Botanicals (For DIY Herbal Tea)
Aug 06, 2019
Basket after basket full of flowers. Crate after crate full of berries. All of the goodness is hauled in from the garden, from the farmer's market, and from around the farm to help produce flavorful and healthful herbal teas. But what is the best way to preserve them? Dehydrating of course!
From late spring to the depths of summer, the harvest starts coming in. Fresh and flavorful Oregon strawberries for Farmer's Market Strawberry tea, earthy antioxidant-packed Aronia berries for Harvest Berry Tea and Aronia Plum Berry Tea, delicate and earthy blackberry leaves to go with those Aronia berries in the Harvest Berry Tea. Whatever the botanical may be, it's a mad rush to get the harvest in and preserved for the winter.
Our favorite way to preserve on the farm is to dehydrate the bounty. Not only does it make fabulous tea, but it's also a great way to put up food as well. With a few simple tips and tricks, dehydrating is also very easy to do.
This post contains affiliate links throughout. Translation: We get a little kick back for sharing certain products, at no additional cost to you, should you choose to purchase said items. And thank you for supporting our farm and family! Read the full disclaimer here.
I don't know about you, but I have this fear of canning. I'm just sure the lid is going to blow its top when I'm not looking. Or that the kids will come into the kitchen and get burnt by touching the caner. And then there is just trying to be mom, answering questions in abundance while dealing with hot jars, hot lids, hot food.
Dehydrating not only is NOT all of that, but it also preserves more of the nutrients in the food. The food isn't cooked to death and most often is dehydrated at a temperature that leaves the food still considered raw.
It's simple to do and it doesn't need to be babysat like a caner. The kids can help too, without me worrying much about them getting hurt. So long as they have proper knife skills.
When it comes to growing and blending your own herbal teas though, dehydrating is a must.
Below we are sharing how we go about dehydrating botanicals here on the farm using our electric dehydrators. We have a 5 tray Excalibur which we love and is perfect for home use. Along with that, we have a 24 tray Cabela's dehydrator that is our workhorse and very necessary to our loose leaf tea business. Recommendations for drying, temperatures, and times are all based on the use of one of these dehydrators.


Dehydrating Berries
We dehydrate so many berries here on the farm. Oregon has quite the abundance and so they are easy to come by fresh. They are a bit harder to come by dried without all of the junk though. Which is another reason that we dry so many on the farm. From strawberries, cranberries, Aronia berries, to haskap and beyond.
The general dehydrating temperatures for fruits is between 130-140 degrees. The timing for each berry will change. Blueberries, haskaps, and cranberries will take much longer than, raspberry or blackberry.
Length of dehydrating time depends on many variables from water content in the food, sugar content, size of the piece of food (whole strawberry vs sliced), the amount of air that is able to circulate around the food, the level of humidity in the air which is dehydrating the food, the temperature inside the dehydrator and the type of dehydrator that you are using.
Depending on the berry you may want to do a little food prep before plopping it into the dehydrator.
Blackberries, raspberries, marionberries, Salmonberries etc. may be placed whole straight on the dehydrator trays.
Strawberries could be done whole but will take a very long time. For us, because they are being used in tea, it is simpler to cut them into about 1/2 inch cubes which when dried make for the perfect size in a tea infuser. They can be sliced or diced however you prefer.
Cherries, plums, and other stone fruits will need to be pitted first. As well as cut in half or smaller.
Blueberries and cranberries, or any other berries with tight/tough skins on the outside, are their own monster. They will need to be pricked, popped, or sliced first in order to speed up dry time and ensure they are fully dried on the inside.
We usually prick and pop blueberries but slice cranberries because cranberries won't do much with pricking.
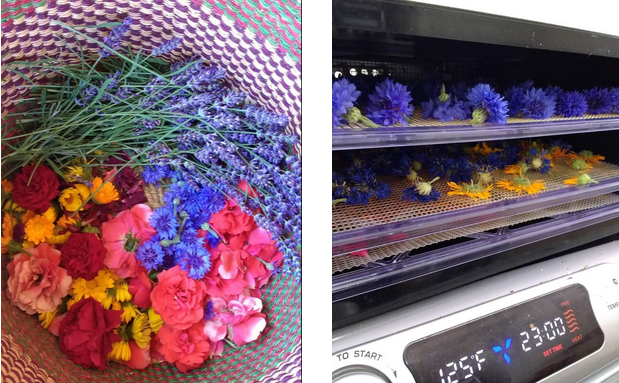
Dehydrating Flowers
While we do a lot of berries here on the farm for tea, we do not actually grow as many berries as we do flowers. Edible flowers provide not only medicinal properties to some of our teas, but they are beautiful to boot. There is nothing like a pop of color from flower petals to bring an herbal tea to life.
There are so many edible flower options! Marigolds, bachelor buttons, cornflowers, chicory flowers, rose petals, calendula, sunflowers, nasturtiums, poppies, elderflowers, echinacea, and the list goes on and on. The trick here though is being able to sacrifice the beauty in the yard to the dehydrator.
For flowers like roses, calendula/marigolds, bachelor buttons or chamomile there are two methods of drying in the dehydrator. One is to pluck the petals off ahead of time and the other is to dry on the flower head and then remove the petals after dehydration. Here on the farm we prefer to dry and then pluck the petals off things like bachelor buttons and calendula, with roses and marigolds we pluck the petals first and then dry. Try both and see which way you prefer!
Place the petals or flower heads on the dehydrator tray approximately 1/4 inch apart to allow for enough airflow during the drying process. Flower heads may need more space as the head itself holds more water. Petals may be spaced much closer since they have less water content and are smaller allowing for a quicker dry time. If they overlap a bit it's OK since they are very small and thin. Since chamomile flowers are so delicate and hard to detach from stems these maybe dried with the stem on but may take longer as the stem is thicker and denser.

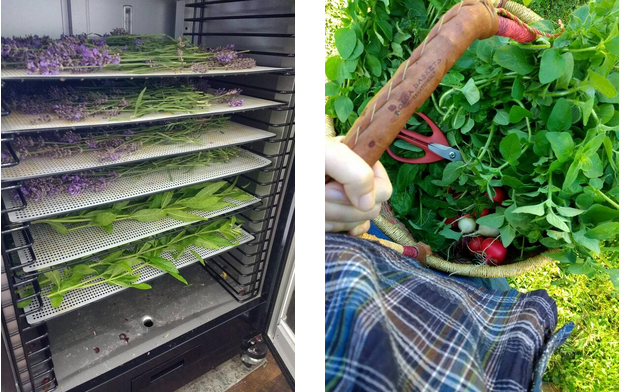
Dehydrating Leaves
Leaves maybe aren't as beautiful and sweet tasting as fruits and berries but they are a huge portion of medicinal herbs on any list. From mints like lemon balm, peppermint, lemon verbena, blackberry and raspberry leaf, nettles, the list could go on and on. Leaves are also pretty simple to dehydrate. They don't pack the complications along with them like the berries do.
When preparing leaves for dehydration it’s also important to harvest the leaves earlier in the day but when the morning dew has dried. Leaves from blackberries and raspberries may be harvested through out the year up until the fall, though the texture and moisture content of the leaf will change.
In the spring after the leaves have unfurled they are a bright green, very soft and contain a lot of moisture. As the year progresses the sun will dry these on the vine a bit. They will be a darker green and work towards brown in the fall before the leaves fall off. In Oregon we have green leaves almost year around. The leaves in the late summer will be very firm and dry. The moisture content in the leaves and their texture changes the dehydration time dramatically.
Mints like peppermint, spearmint, lemon balm ect. should be harvested before they bloom in the late spring or early summer depending on your growing season. Catching these lovely herbs before they bloom leaves the most oils in the leaves and the most fragrant smelling herbs. Harvest them about 2-3 inches from the ground above the last rung of leaves so that they can still collect a little sunlight. Strip the leaves from the stem for drying. If you want gently rinse these under cool water. They are a little tougher than flowers and usually there is more exposed space for bug or bird residue.

Dehydrating Roots
Dehydrating roots probably take the cake when it comes to complicated botanicals to dry. They are thicker and firmer and much harder than any of the other botanical pieces. Roots can really bring some great flavor and medicinal properties to your herbal teas though. The pungent zing of ginger and the anti-inflammatory properties of turmeric are surely herbs you don't want to leave out of your apothecary and tea blending menu.
It's best to prepare the roots in the shape and size you want to use them before dehydrating as they are very difficult to deal with once dried. The only exception here may be a powder. If you are wanting to powder roots dry them in the smallest form possible so your grinder has an easier time turning them into powder.
Drying roots takes much longer than leaves, berries, and flowers. They also hold up to heat and direct light better. If roots are large, after cleaning, chop them into smaller pieces so that they dry faster. Smaller roots, such as dandelion, may be dried whole unless it is easier to process them smaller before drying, as they can be difficult to process once dried. Drying time is around 4 hours at 200 degrees F.

From the bounty of the summer garden comes warm, satisfying and cozy teas in winter. The flavors and recipes that can be made with a small amount of home grown herb are unlimited. Dehydrating the harvest is the best way to preserve goodness!
Looking to learn more about growing, preserving, and blending your own teas at home? Check out our e-book Growing Herbal Teas and D.I.Y. Medicinal Teas. It's like having a friend there blending with you!
What is the first botanical that you are going to dehydrate? Let us know in the comment section below!