How to Build a Wooden Raised Garden Bed
Apr 29, 2025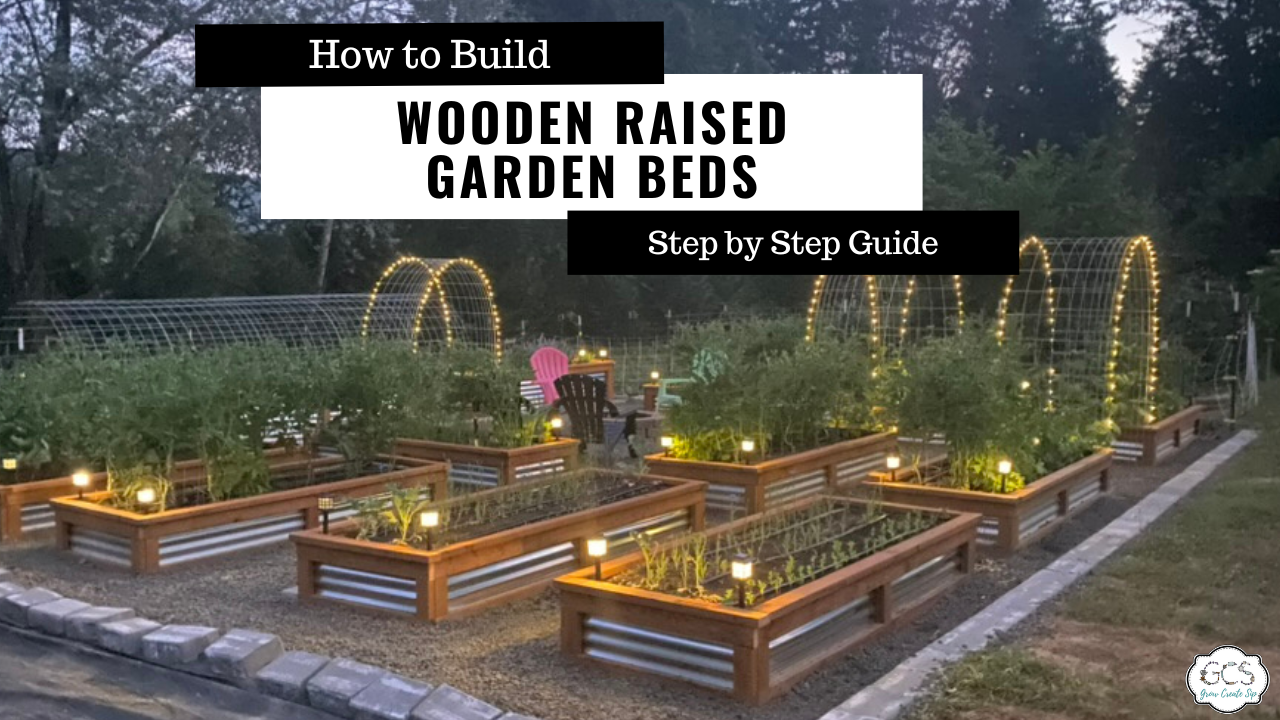
If you have clay soil on your property, you are likely no stranger to the fact that it turns into a rock in the summer. This type of soil is difficult to work in, doesn’t take water very easily, and will either flood until it’s muddy or just not get enough water to the plants.
Thankfully, raised garden beds make it so that you don’t have to worry about muddy or hard soil anymore! These beds have turned our unusable area into a beautiful space we use all the time. Plus, as we are aging into our young 40s and 50s, we find that it’s nice to have the garden off the ground and raised a little bit.
Today we will be talking all about how to build raised garden beds! We will discuss the tools you need, the steps you should take to prepare the space, and how to get started with filling raised garden beds. We will also cover some inexpensive raised garden bed ideas so that you can maximize your space in a budget-friendly way.
The Legal Stuff
This blog is provided by St. Fiacre's Farm LLC for informational purposes only. It does not constitute medical advice, and you should always seek the advice of a qualified healthcare provider for any medical questions or concerns.These statements have not been evaluated by the Food and Drug Administration. This product is not intended to diagnose, treat, cure, or prevent any disease. Please note that we may earn a small commission on any purchases you make through our affiliate links, at no additional cost to you. Thank you for your support!
Why We Decided to Build a Wooden Raised Garden Bed
God blessed us with an amazing place to start our farm, but one challenge we have learned to work with is the clay soil. Clay soil has poor drainage, meaning that a lot of water ends up sitting on top. As you might expect, this creates a muddy disaster.
What’s more, during the hotter and drier months on the farm, we have a hard time getting the shovel into the ground to plant. Plants with small roots usually have a tough time with the hard clay, and root vegetables like potatoes don’t like to get very big either because they have to fight against the soil.
Building and filling raised garden beds has been our way of (literally) rising above the mud, and we are excited to share with you everything we’ve learned!
How to Build Raised Garden Beds
Before we talk about how to build a wooden raised garden bed, we want to share some of the benefits of adding these DIY raised beds to your garden:
- Raised garden beds are more controllable, especially when it comes to moisture and soil quality.
- They are so pleasing to the eye! Your garden beds will add character and dimension to your backyard.
- It is more affordable to build your own beds than buying pre-constructed ones.
- They keep the critters out a little bit better, like dogs, cats, and sometimes kids.
- There is less need to till and turn over soil by just simply adding new compost every year.

Tools Needed
In this post, we are focusing on how to prepare the perfect layout for your boxes. Keep reading to find our free guide with step-by-step instructions for how to build your own raised garden beds. For the actual building, you will need the following tools and materials:
Basic Tools
- Saw
- Drill
- Tape Measure
- Square
- Tin Strips
Recommended Tools
- Clamps
- Keg Drill Jig
- Electric Metal Shear
Supplies
- 10-12 Pressure Treated 2x4x8 Wooden Beams
- 3 Sheets of 2x8 ft. Galvanized Corrugated Sheet Metal
- 60-70 3” Wood Deck Screws with T25 head
- 60-70 1” Sheet Metal Screws (Teks #9 with a 1/4" hex head & coated for corrosion resistance)

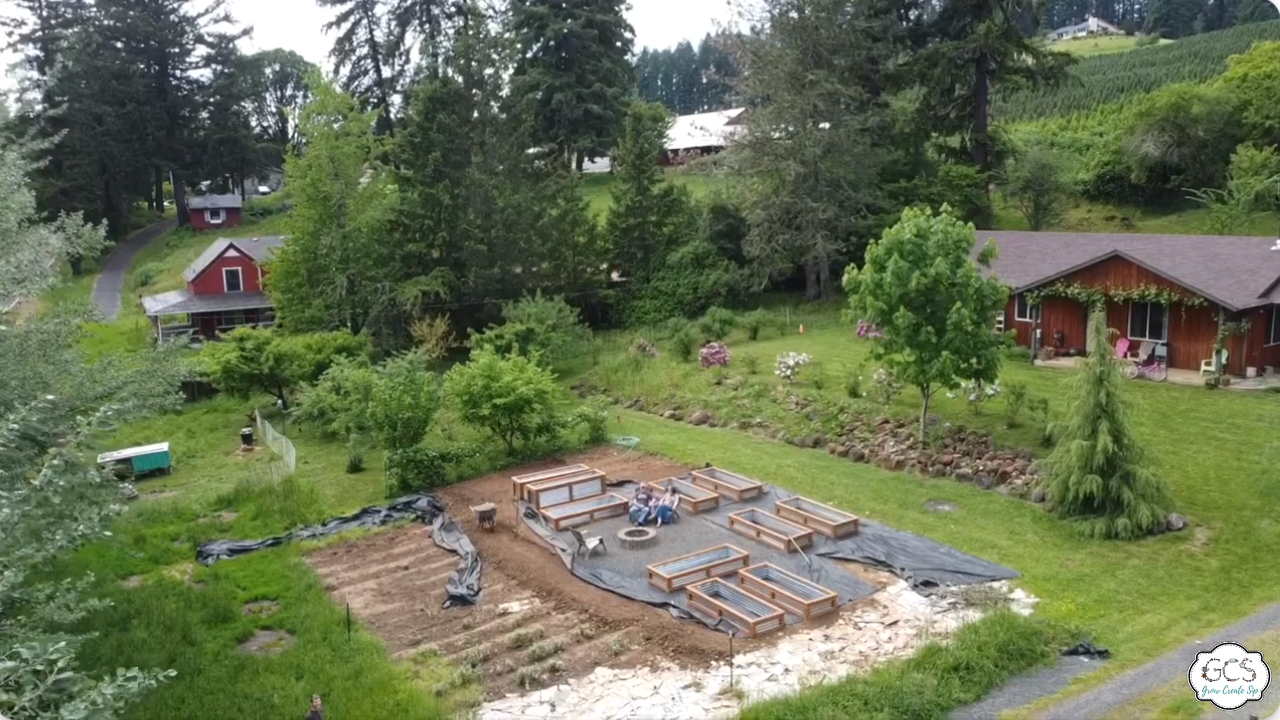
Step 1: Level the Ground
For your garden box layout to reach its full potential, you need to start with leveled ground. This was a super important step for us because our farm sits on a hill. You can use a tape measure and laser transit to do some measuring from end to end and make sure your surface is level.
Step 2: Add the Weed Barrier
Next, grab some landscape fabric and lay it out across your desired area. The main reason we include this layer is to help keep the weeds down, but there are other benefits too. This weed barrier helped us to cover any buried junk or nails that were left in our yard by the previous owner. That stuff was not fun to garden in!
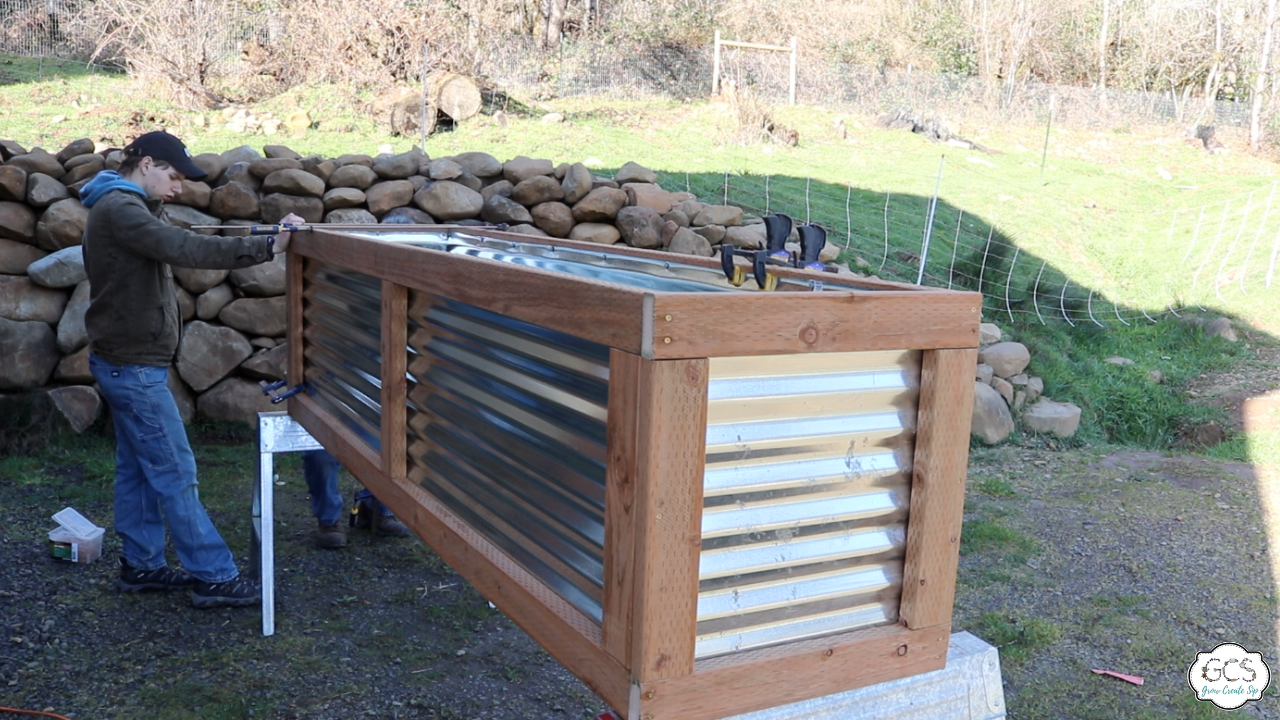
Step 3: Build the Boxes
Now that your space is ready, it’s the moment we have all been waiting for… it’s time to build the boxes!
First, cut the wood and metal to the following dimensions:
Pressure treated 2x4x8-feet boards:
- Keep 4 uncut (that was easy)
- Cut 4 to 2x4x24-inches
- Cut 10 to 2x4x18-inches
Galvanized corrugated 2x8-feet sheet metal:
- Keep 2 uncut (again, that was easy)
- Cut 2 to 2x19-inches
Next, build the frames:
- Pre-drill all of our screw holes with the Kreg jig
- Lay out your 2x4s to form a frame for the long sides of your box, then clamp them together.
- Screw them together using the 3-inch screws.
- Duplicate this again so you have two frames, one for each long side of the box.
- Then, we repeat the same process as above to form and assemble the ends of the box.
- Double-check your frames are square, then attach a metal sheet to each long side.
- Repeat this process for the short sides of the box.
- Use clamps to hold the panels together, check the box is square, then screw it together.
- The last step is to put a rim on the top edge of the box. This will dress up the box and give it a nice finished look.
- Screw down the rim using the 3-inch screws and put at least seven screws in the sides and at least four screws on the ends.
Be sure to grab our much more detailed, printable instructions in our Raised Garden Box Plans ebook!
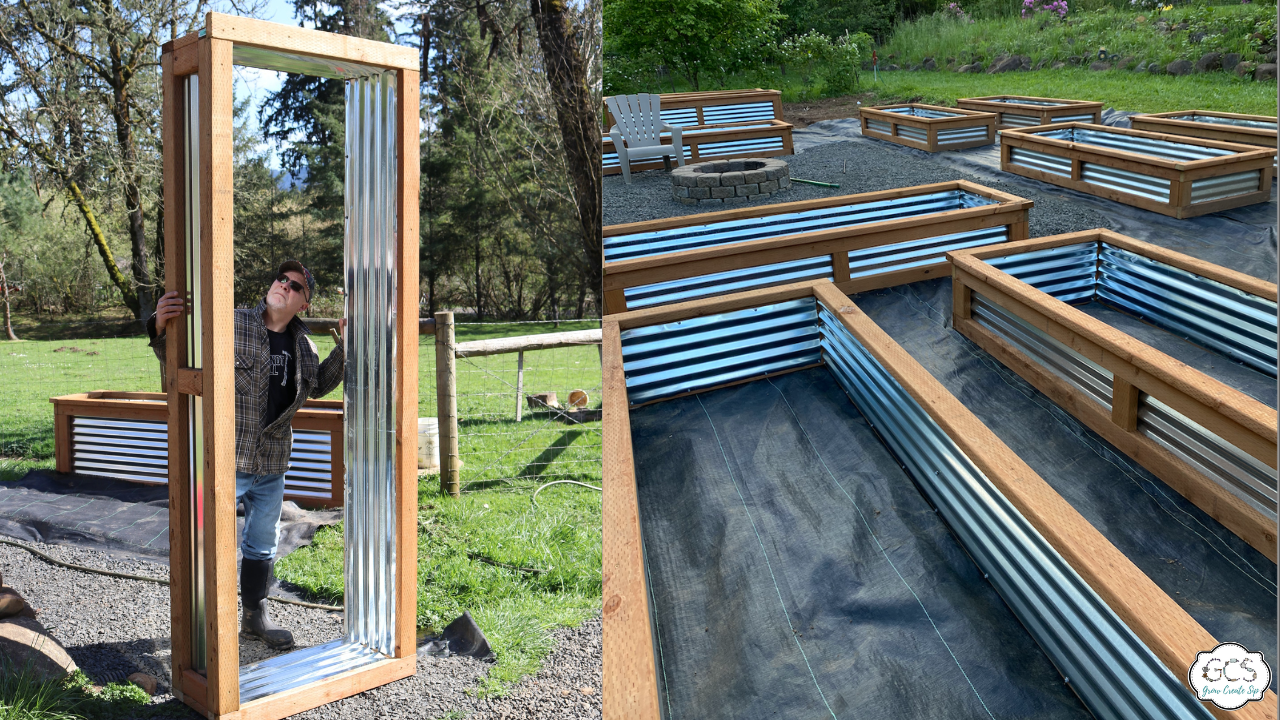
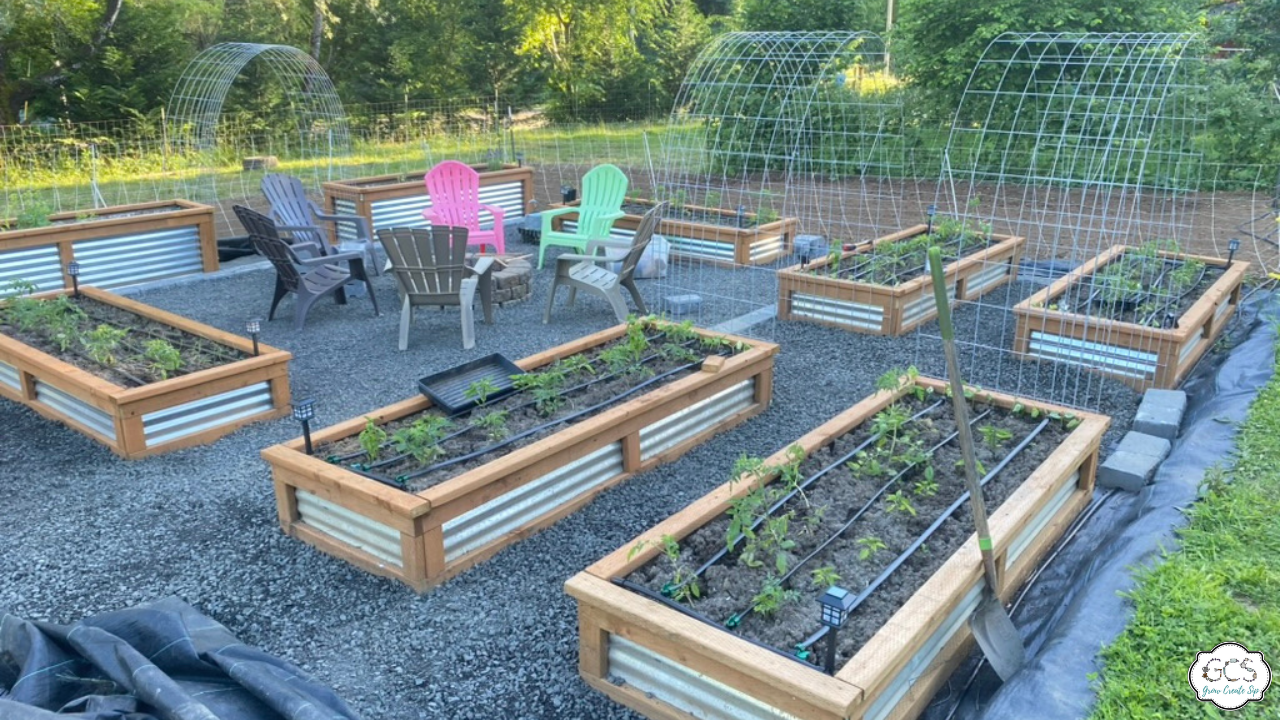
Step 4: Move the Boxes
Now for the moment we have all been waiting for… it’s time to bring the boxes in! This is where you can get creative and arrange the perfect layout for your needs and goals. We chose to make our fire pit the centerpiece of our garden and have our boxes arranged around it. This way, our garden could be functional and beautiful while also being the perfect gathering spot for family time.
Step 5: Set up Irrigation
Once you have your boxes in your desired spot, the next step is to get your watering system set up. Getting irrigation plumbed in will ensure that all your plants get the right amount of water — not too much or too little.
Step 6: Spread Gravel Between Boxes
A step that you won’t want to skip is gravel. It helps with drainage around each wooden raised garden bed and looks great too by adding texture to your layout!
Step 7: Maximize your Space
Ready to take your garden layout to the next level? Remember that you can decorate and plant around the boxes, not just in them! Here are some inexpensive raised garden bed ideas you can use to maximize the beauty and efficiency of your space:
- Add cattle panels for tunnels around your boxes to grow green beans, cucumbers, and any climbing plant.
- Focus on vertical gardening, such as using twine to have peas climb up.
- Light up the space with twinkle lights or solar lights, because why not!
- Install water fountains and fireplaces to add ambiance and a fun entertainment area or retreat.
As your garden comes to life, we encourage you to think about ways you can expand it. You could always till around the outer edges of your garden and plant in the traditional style so that you are growing things at different levels.
Filling Raised Garden Beds
Before you get to planting, you will need to think about how you want to fill your beds. One of the best inexpensive raised garden bed ideas is incorporating hugelkultur, a German method using organic materials, since filling every box with good soil would get pretty pricey quickly.
Tomatoes, peppers, cucumbers, beans, and herbs are some of the best crops to grow in your newly constructed gardens. For companion planting, you may want to grow onions and marigolds too. Learn more about companion planting to help save your plants and your sanity.
Wooden Raised Garden Bed Frequently Asked Questions
How deep should a garden bed be?
It’s a good rule of thumb to have at least 8 inches of depth for raised garden beds. That will ensure that there is enough space for the roots of the plants you are growing.
How long do garden beds last?
A wooden raised garden bed can last for a long while — anywhere from 5 to 10 years — if it is made from high quality materials.
What are the benefits of filling raised garden beds with hugelkultur?
Hugelkultur retains water well and can be helpful in growing more nutrient-dense crops. If you are looking for inexpensive raised garden bed ideas, using hugelkultur is an affordable and effective option.
Simply Grow More With the Right Tools
If you have been dealing with tricky soil conditions like us or simply want to try a new layout in your garden, adding raised garden beds is a great place to start.
Ready to build your own wooden raised garden bed? Be sure to download our FREE guide for the best raised garden bed plans.

Top Tips for Growing Your Own Herbalist Garden
- Getting Started on Planting Your Herbalist Garden
- Affordable and Productive Medicinal Plants to Grow
- Vertical Gardening Tips & Budget Friendly Gardening
- 10 Herbs to Plant in Spring
- How and When to Harvest Herbs
- Companion Planting Chart for Herbs